Introduction
Writing cheques by hand is a practice as old as banking itself, but let’s face it: it is prone to errors. A simple spelling mistake in the amount, a messy signature, or bad handwriting can lead to your bank rejecting the payment. This is embarrassing for individuals and unprofessional for businesses.
Fortunately, you don’t need expensive enterprise software to solve this. You can print cheques on a home printer (HP Printers) using standard A4 or Letter paper settings.
In this guide, we will walk you through the exact steps to print professional, bank-compliant cheques using your existing laser or inkjet printer and our free online cheque printing tool.
Why You Should Stop Handwriting Cheques
Before we dive into the “how-to,” it is important to understand why shifting to digital printing is safer and smarter.
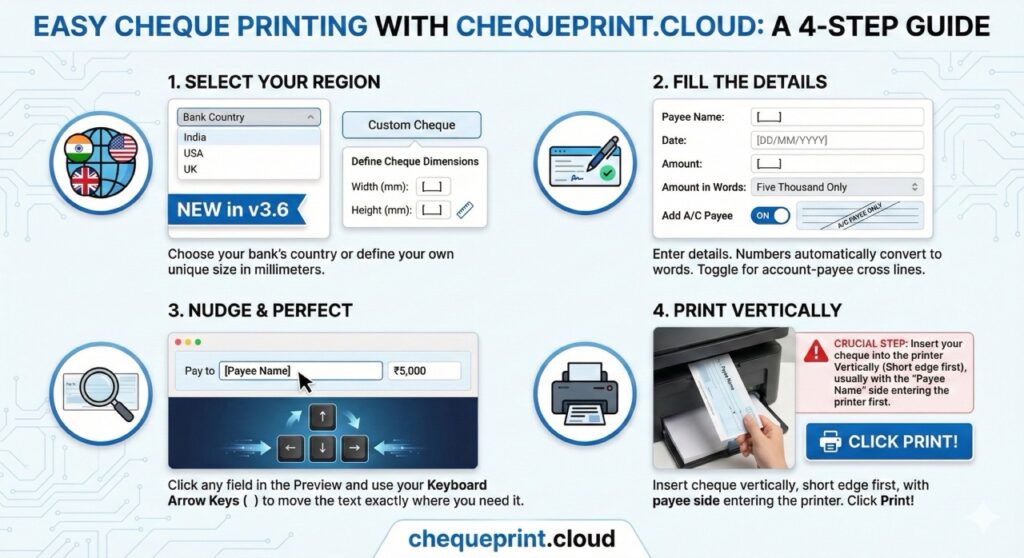
- Zero Spelling Errors: When you handwrite “Forty Thousand,” it is easy to accidentally write “Fourty” or misplace a zero. Digital tools auto-convert numbers to text (e.g., 5000 becomes “Five Thousand Only”).
- Professional Appearance: A printed cheque looks clean, legible, and establishes trust with your vendors or landlords.
- Record Keeping: When you type details into a browser tool, you are more likely to double-check them against your invoice, reducing payment errors.
- Bank Compliance: Banks use OCR (Optical Character Recognition) scanners. Printed text is 100% readable by machines, ensuring faster clearing times.
What You Need to Get Started with print cheques on home printer
You likely already have everything you need in your home office:
- A Standard Printer: Any Laser or Inkjet printer works. HP printers, Canon, Brother, and Epson are all compatible.
- Cheque Leaves: The standard cheque book provided by your bank (Indian bank like SBI, HDFC, ICICI, USA Banks like JPMorgan Chase: (Chase), Bank of America: (BofA), Citigroup etc and UK Banks like Lloyds Bank, Barclays, HSBC etc)
- A Ruler: Required for the first-time setup to measure your cheque size.
- ChequePrint.Cloud: Our free cheque printing tool (Click to open in a new tab).
Step-by-Step Guide to Printing Cheques on home printer
Step 1: Measure Your Cheque
While most banks follow the CTS-2010 standard (in India), American National Standards Institute (ANSI)(in America) and British Standard Institute(BSI) (in UK), slight variations exist.
- Take a ruler and measure the width and height of your cheque/check(USA) leaf according to your region.
- Standard size is usually 8 inches x 3.5 inches (approx 203mm x 89mm).
- Note: You need to input these sizes into our tool if you go with “Custom Cheque” option or you need to adjust the placement of input fields like Payee Name, Date etc.
Step 2: Configure Your Printer Settings
This is the most critical step. If your printer settings are wrong, the text will print too small or in the wrong corner.
- Open the Cheque Printer Tool.
- Fill in your details (Date, Payee Name, Amount).
- Click Print.
- When the system print dialog opens, look for “More Settings” or “Scale”.
- Set Scale to “100%” or “Actual Size”.
- Warning: Never select “Fit to Printable Area” or “Fit to Page”. This will shrink the text and misalignment will occur.
- Paper Size: Select A4 (Default Setting). Our tool is designed to position the cheque at the top-left or center relative to a standard sheet.
Step 3: The “Plain Paper” Test (Don’t Skip This!)
Never put a real cheque leaf into the printer on your first try. Cheques are valuable documents, and you don’t want to waste one.
- Cut a plain piece of white paper to the approximate size of your cheque.
- Or, simply use a full A4 sheet.
- Print the cheque details onto this plain paper.
- The Light Test: Hold the printed plain paper up against a light source (like a window). Place your real cheque leaf behind it.
- Check if the “Payee Name” and “Amount” line up with the lines on the real cheque.
Step 4: Adjusting Alignment (The Secret Sauce)
Did the text print slightly too high or too far to the left? This is normal because every printer grabs paper differently.
Is the alignment slightly off? Click any field in the Preview and use your Keyboard Arrow Keys () to move the text exactly where you need it.
Step 5: Printing the Real Cheque
Once your alignment is perfect:
- Remove all plain paper from your printer tray.
- Orientation: Identify how your printer feeds paper. Look for the icon on the tray.
- Face Up: Place the cheque face down with the “Payee Name” side entering first (usually).
- Adjust the paper guides (the sliding plastic clips) in the tray so the cheque leaf sits snugly and doesn’t rotate.
- Click Print.
Settings for HP Printers LaserJet & DeskJet
Most HP printers feed paper from the top or bottom tray. If using an HP LaserJet 1020 or similar, place the cheque face up. Ensure ‘Scale’ is set to 100% in the print dialog
Common Troubleshooting Tips
- Paper Jam: If your printer struggles to grab the small cheque leaf, you can tape the cheque (lightly) to a standard A4 sheet carrier. However, most modern printers handle cheque sizes just fine via the manual feed slot.
- Ink Smearing: If using an Inkjet printer, allow the ink to dry for 30 seconds before touching the cheque to avoid smudging the payee name. Laser printers do not have this issue.
- Bank Rejection: Ensure you do not print over the MICR band (the white strip with special numbers at the bottom). Our tool is designed to keep this area clear, but always double-check.
Is it Safe to Print Cheques Online?
Security is a major concern when handling financial data. It is important to note that ChequePrint.Cloud is a client-side tool.
This means that when you type “John Doe” and “5000”, that data never leaves your computer. It is processed by your browser (Chromehttps://www.google.com/search?q=/Edgehttps://www.google.com/search?q=/Firefox) solely to generate the print preview. We do not save, store, or view your transaction details. You get the convenience of a cloud tool with the privacy of offline software.
Conclusion
Printing cheques on a home printer is fast, secure, and professional. By following this guide and using the right tools, you can ensure your payments are always legible and accepted by banks without issue.
Ready to print your first cheque? Go to the Cheque Printer Tool now and try the “Number to Words” feature for free.
Q. How to print cheque in HP printers?
Most HP printers feed paper from the top or bottom tray. If using an HP LaserJet 1020 or similar, place the cheque face up. Ensure ‘Scale’ is set to 100% in the print dialog
Q. Which printer is best for check printing, HP printers, Cannon or Brother?
A. All printers are good in their own ways but post people use HP printers at their homes and there is large community for HP printers.
Q. Can I adjust the cheque fields like Payee Name, Date fields placement if I want?
A. Yes, you can change the position of all the fields like Payee Name, Amount in Words, Amount and date as well as “A/C Payee”. You can place them wherever you want in the cheque by just tapping the input fields in the preview and move the fields by keyboard arrow keys.