If you run a small business or manage personal finances in the United States, you already know the absolute frustration of trying to print on physical check leaves using a standard home or office printer.
You guess the margins, run a test print, and inevitably watch in horror as the payee name overlaps the date line, or worse, the printer pulls the paper crooked and jams. You end up voiding expensive, sequentially numbered checks just trying to get the alignment right.
You do not need expensive, clunky enterprise software to fix this. Whether you are using a standard HP LaserJet, a Canon PIXMA, or a Brother HL series, printing perfectly aligned checks is entirely possible with the right check format for printing.
Here is exactly how to measure your US custom dimension checks, load them into your printer correctly, and use our 100% free, secure tool to get perfect alignment on the very first try.
Understanding US Check Formats for PrintingYour Attractive Heading
Unlike some countries that have a single, strict national standard for bank checks, the US banking system (including institutions like Chase, Bank of America, and Wells Fargo) utilizes a variety of check sizes.
Generally, US checks fall into two main categories:
- Personal Checks: These are the smaller checks in your standard checkbook, typically measuring around 6.00 x 2.75 inches (approx. 152 x 70 mm).
- Business Checks: These are larger, often coming in 3-to-a-page binders or designed to be printed with accounting software, usually measuring around 8.25 x 3.00 inches (approx. 210 x 76 mm).
Because of these variations, relying on a standard Microsoft Word template usually results in disaster. To get perfect text placement, you need to know the exact physical dimensions of your specific check leaf.
Step 1: How to Measure Your Check Dimensions Perfectly
Before you can format your text, you need to measure your canvas. Grab a standard millimeter ruler and your blank check leaf.
- Measure the Total Width: Lay your check completely flat. Place the zero mark of your ruler on the absolute left edge of the paper and measure straight across to the right edge. Note this measurement in millimeters (mm).
- Measure the Total Height: Place the zero mark of your ruler on the absolute bottom edge of the check and measure straight up to the top edge. Note this measurement in mm.
- Identify the MICR Line Boundary: The bottom of a US check contains a string of magnetic ink characters (your routing and account numbers). When setting up your print boundaries, ensure your text fields (like the memo or signature line) sit well above this MICR band so they do not interfere with bank scanning machines.
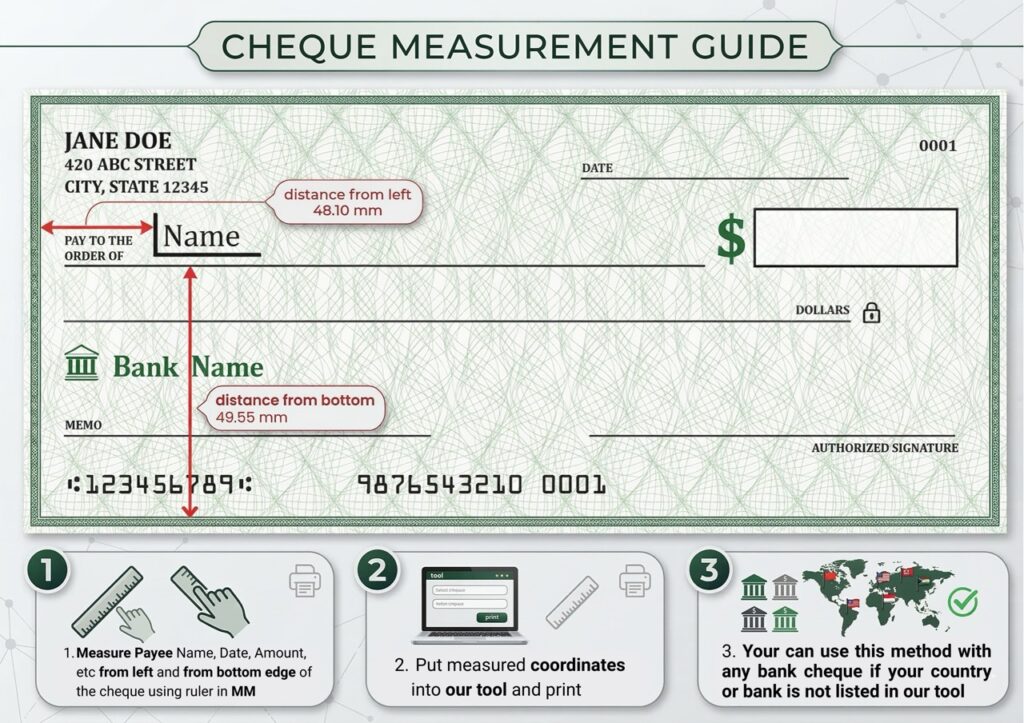
Once you have your exact width and height in millimeters, you are ready to plug these custom dimensions into a dedicated formatting tool.
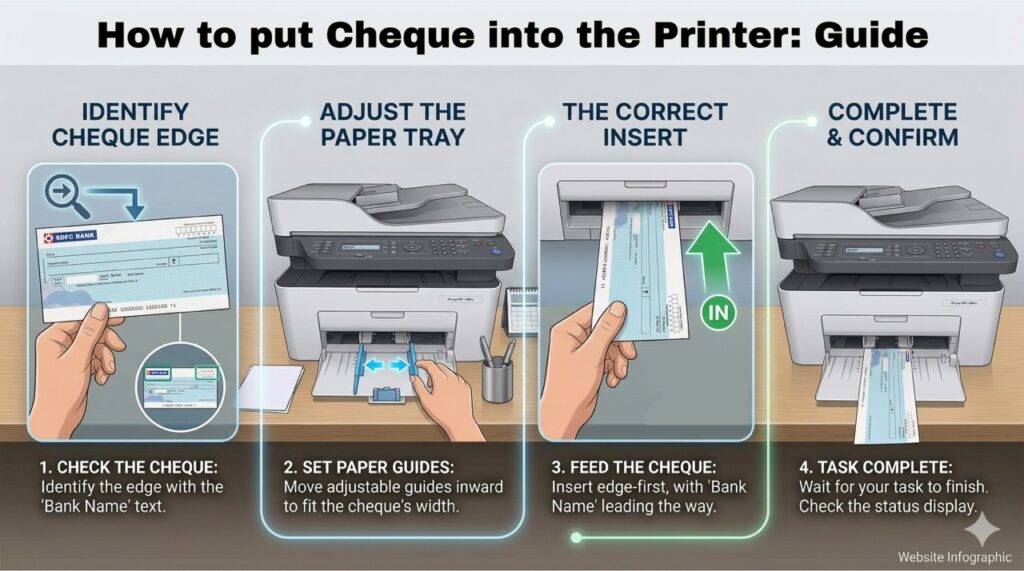
Step 2: How to Feed Checks Into Your Home Printer Without JamsYour Attractive Heading
The number one reason checks print upside down or skewed is improper feeding. Standard A4 or Letter-sized printers are equipped with strong rollers designed to pull large sheets of paper. When you feed a small personal check into those rollers loosely, it will almost always pull crooked.
Follow this feeding guide to ensure a straight, jam-free print:
1. Choose the Correct Tray
Never throw a loose check into the bottom of a deep paper cassette.
- If you have a laser printer (like an HP LaserJet or Brother HL), use the Manual Feed Slot or Priority Bypass Tray. This provides a straighter path through the printer.
- If you have a top-loading inkjet (like an Epson EcoTank or Canon PIXMA), use the Rear Feed Tray.
2. Set the Orientation
You must know how your specific printer flips paper.
- Face-Up / Top Edge First: Most manual feed slots on laser printers require the paper to go in face-up, with the top edge (where the date sits) entering the machine first.
- Face-Down: Many bottom-cassette inkjet printers flip the paper 180 degrees inside the machine. For these, place the check face-down.
- Pro Tip: Always take a blank piece of paper, draw an “X” on one side and an arrow pointing up, run it through your printer, and see how it comes out. This tells you exactly how your machine handles paper orientation!
3. Secure the Paper Guides
This is the most critical step. Slide the plastic paper width guides inward until they gently but firmly rest against both the left and right edges of the check. If there is a gap, the rollers will pull the check at an angle, ruining your print.
Print Checks Online Free (The 100% Secure Solution)Your Attractive Heading
Now that you have your measurements and know how to load the printer, it is time to generate the text layout.
You can use ChequePrint.Cloud to handle all the formatting instantly. We built this tool to solve the exact headaches mentioned above, and it is optimized for US users.
- Open the Tool: Go to our free alignment tool. There is no software to download, no account to create, and no login required.
- Select Your Region: Choose USA from the regional dropdown.
- Enter Custom Dimensions: Input the precise millimeter width and height you measured in Step 1.
- Type Your Details: Enter the payee name, date, and numerical amount. The tool will automatically generate the written word amount for you.
- Adjust the Coordinates: Use the live preview to drag or adjust the X and Y coordinates. Move the text until it perfectly matches the blank lines on your physical check.
Your Attractive HeWhy It Is Completely Safeading
You might be wondering: Is it safe to type my financial details into a website? Yes. Our tool is built with 100% Client-Side Security. This means there is no database running in the background. The software operates entirely within your own local web browser cache. When you type in a payee name or a dollar amount, that data never leaves your computer, and it is never transmitted to our servers. As soon as you close the tab, your data vanishes.
Stop wrestling with clunky templates and wasted paper. Grab your ruler, measure your check, slide it into your printer guides, and use our free tool to print your US checks perfectly aligned, every single time.