Whether you are paying rent, clearing vendor invoices, or disbursing salaries, physical cheques remain a crucial part of doing business in India. However, writing cheques by hand can look unprofessional, and a single spelling mistake or an overwriting error means you have to tear up a secure cheque leaf and start over.
Many business owners try to solve this by printing cheques at home or in the office. But without the right software, you usually end up with the payee name overlapping the “Date” box, or the paper jamming in your printer.
You don’t need to buy expensive accounting software like Tally just to print a simple cheque. Here is exactly how you can format, align, and print standard CTS-2010 cheques for SBI, HDFC, ICICI, and more, using a 100% free and secure online tool.
Understanding India’s CTS-2010 Cheque StandardYour Attractive Heading
In 2010, the Reserve Bank of India (RBI) introduced the Cheque Truncation System (CTS-2010). This standard ensures that all bank cheques across India have a uniform layout, mandatory security features (like watermarks and a pantograph), and standard placements for the Date, Payee Name, Amount, and Signature.
Because the layout is standardized, most Indian bank cheques—from Punjab National Bank to Kotak Mahindra—share very similar dimensions.
- Standard Indian Cheque Size: Typically around 8.00 x 3.66 inches (roughly 203 x 93 mm).
Because the dimensions are so consistent across Indian banks, printing them should be easy. The trick is getting your computer to talk to your home printer without shifting the text.
How to Print Cheques Perfectly Without JamsYour Attractive Heading
The biggest nightmare of printing cheques is feeding them into the printer. Standard printers are designed for large A4 paper, so feeding a small, 8-inch cheque leaf can cause it to pull crooked.
Here is how to load your cheque correctly based on the printer you use in your office:
1. HP LaserJet & Brother Laser Printers
Laser printers are fantastic for cheques because the toner melts into the paper, making it smudge-proof and highly secure against cheque washing.
- How to feed: Use the Manual Feed Slot (the small tray on the front). Place the cheque face-up with the top edge (where the date goes) entering the printer first. Slide the plastic paper guides tightly against the sides of the cheque so it pulls straight.
2. Epson EcoTank & Canon PIXMA (Inkjet)
Ink tank printers are incredibly popular in Indian offices. Just ensure you give the cheque 30 seconds to dry after printing so the ink doesn’t smudge.
- How to feed: If your printer has a Rear Paper Tray, use it! It keeps the cheque flat. Place the cheque face-up. If you only have a bottom cassette, place the cheque face-down, as the printer will flip it internally before printing.
Your Attractive Heading Step-by-Step: Using ChequePrint.Cloud
Now that your printer is loaded, you need to generate the text. We built ChequePrint.Cloud specifically to make aligning Indian CTS-2010 cheques effortless.
Here is how to use it:
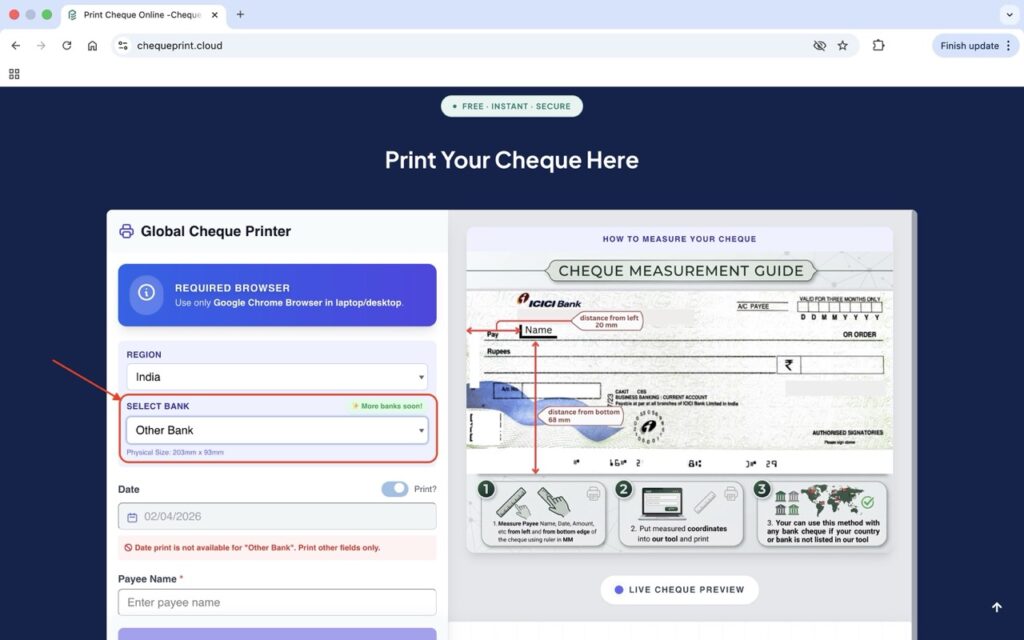
- Open the Tool: Go to our cheque printing tool. It opens instantly in your browser. No downloads or sign-ups are required.
- Select Your Bank: Choose India from the region menu, and then select your specific bank (e.g., SBI, HDFC, ICICI, Axis) from the dropdown. The tool will automatically load the exact millimeter dimensions for that bank.
- Enter Your Details: Type in the Payee Name, Date, and the Amount in numbers. The tool will magically generate the “Amount in Words” (using the Indian Lakhs/Crores format automatically).
- Add ‘A/C Payee’: For secure business transactions, the tool allows you to easily print the “A/C Payee Only” crossing on the top left, giving your cheque a highly professional look.
- Print & Test: Click print! Pro tip: Always do a test run on a blank piece of A4 paper first. Hold the printed A4 paper over your real cheque leaf up to a window or light source to ensure the text lands perfectly on the lines.
- If your Bank is not listed: Because of this strict CTS-2010 standard, 95% of the layout on an Indian cheque is identical across all bank except Date Box. Every bank have slightly different position of Date Box, so if your bank is not listed you have select “Other Bank” option and print without date box until we add your bank in the list.
How to Print Cheques for Any Indian Bank: The “Other Banks” Printing GuideYour Attractive Heading
India’s banking system is vast. While major players like SBI, HDFC, and ICICI handle millions of transactions, millions more are processed through Regional Rural Banks (RRBs), State Cooperative Banks, and smaller private institutions.
If you want to print a cheque from a smaller bank—like Saraswat Bank, Kerala Gramin Bank, or a local cooperative bank—you might be frustrated when you don’t see your specific bank listed in a standard cheque printing tool.
Don’t worry! You do not need a custom template for your specific bank. Thanks to Reserve Bank of India (RBI) regulations, you can perfectly align and print cheques for any bank in India using a simple workaround on ChequePrint.Cloud.
Here is how to use the “Other Banks” feature to print a professional cheque for an unlisted bank.
The CTS-2010 Secret: Why All Cheques Are Almost Identical
In 2010, the RBI implemented the CTS (Cheque Truncation System) standard across all banks in India. This was done so that cheque clearing machines could scan cheques uniformly, regardless of which bank issued them.
Because of this strict CTS-2010 standard, 95% of the layout on an Indian cheque is identical across all banks.
- The “Payee Name” line is always in the same place.
- The “Rupees in Words” lines follow the exact same spacing.
- The “Amount in Numbers” box is locked into the same right-hand coordinate.
- The bottom 0.625 inches is always reserved for the magnetic MICR band.
There is only one minor difference: The Date Box. While the location of the date is generally the same (top right) but the size of the date boxes are slightly different. To maintain the precision of each boxes we have to calculate every mili-meter. [D][D][M][M][Y][Y][Y][Y]
Because of this date box variation, trying to automatically print the date on an unlisted bank cheque can sometimes result in numbers printing outside the lines. But there is a perfect, stress-free solution.
The “Other Bank” Hack: Print Everything Except the Date
If your specific bank is not in our dropdown menu, you can still use ChequePrint.Cloud to format the hardest parts of the cheque perfectly. We have created an “Other Banks” preset that automatically prints the Payee, Amount in Words, and Amount in Numbers, but deliberately leaves the date blank.
Here is the step-by-step guide to doing this:
- Open the Tool: Go to the free alignment tool at ChequePrint.Cloud.
- Select Your Region: Choose India from the regional dropdown menu.
- Choose “Other Bank”: Click the bank dropdown list. Instead of looking for your specific cooperative or regional bank, simply select Other Bank.
- Enter Your Details: Type in the Payee Name and the Amount in numbers (the tool will automatically generate the Indian Lakhs/Crores wording). Leave the date field blank.
- Print Your Cheque: Feed your cheque into your printer (check our printer feeding guide to avoid paper jams) and hit print.
- Pen in the Date: Once the cheque prints out with beautiful, machine-perfect alignment for the payee and amounts, simply grab a pen and write the date into the top right boxes manually!
Printer loading guide
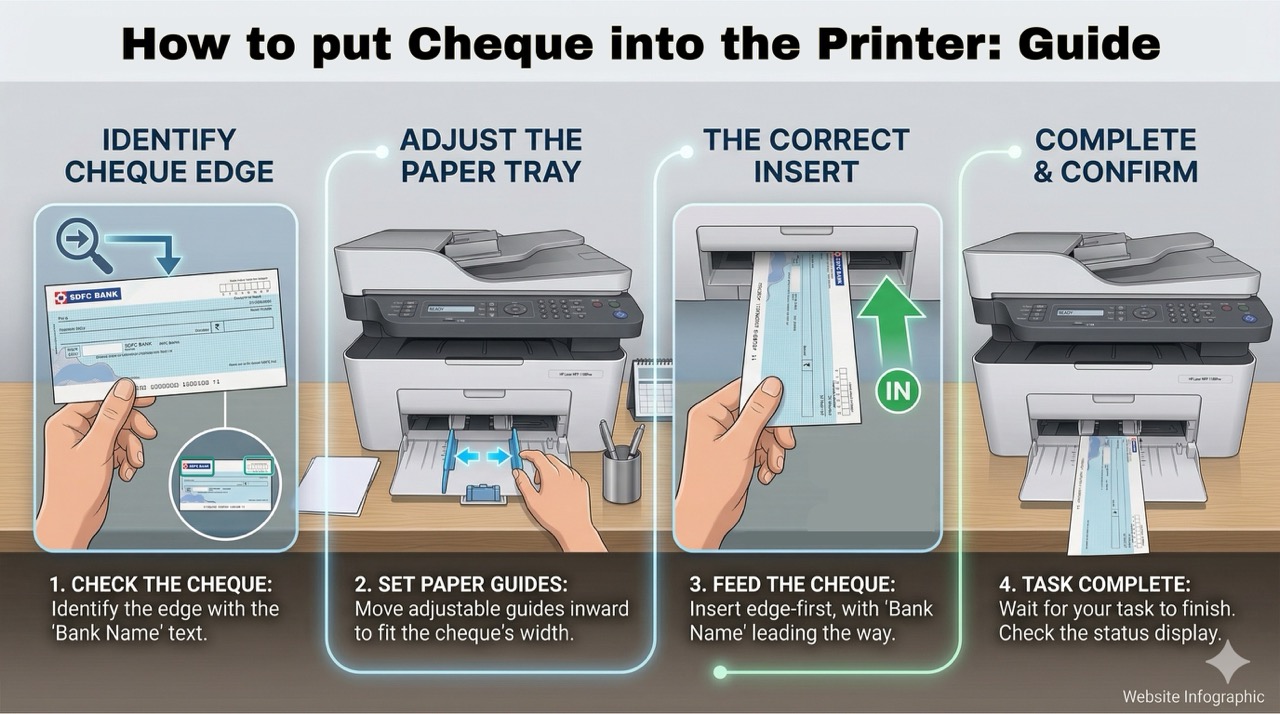
How to put your cheque into the printer
Follow these four steps carefully — loading the cheque in the wrong direction is the most common cause of a misaligned print.
Identify the edge that has the Bank Name printed on it. This edge goes into the printer first.
Move the printer’s adjustable paper guides inward to match the exact width of your cheque.
Insert the cheque short edge first, with the Bank Name side leading. Hold it straight as it feeds.
Wait for the printer to finish. Check the status display and collect the printed cheque carefully.
For US/UK check printer guide visit How to print US check article.
Is it Safe to Type Financial Details Online?
This is the most important question. Yes, ChequePrint.Cloud is completely safe because it is built with 100% Client-Side Processing.
This means there is no central database. When you type your payee name and amount, that data stays inside your own laptop’s browser. It is never sent over the internet, and we never see it. Once you close the tab, the data is gone forever.
Stop wasting expensive cheque books and writing out long payments by hand. Use ChequePrint to generate professional, perfectly aligned CTS-2010 cheques in seconds.
For US/UK check printer guide visit How to print US check article.